
jump to installation instructions for x86 computers • for RPis • post-install
No, I am not saying that switching to Linux is extremely easy… after all, change is a difficult thing. When you’re used to one way of doing things your whole life, changing to a totally different way of doing it is going to naturally take some time.
…but as the title says, it’s also not as difficult as you may think! Linux on the desktop has come a long way since I started messing around with it in high school a decade ago, and even back then it was easy enough for me to install Ubuntu 14.04 and mess around with it, even though back then I barely even knew how to get into the BIOS lol.
But why didn’t I have much trouble? Well, there’s been a lot of work put into making installing it and using it easy enough that you don’t have to even interact with a terminal to do most things. Most of the major Linux distributions (distro for short) have easy graphical installers to guide you through installing them, and these distros along with the Linux kernel itself have amazing off-the-shelf driver compatibility. Also, all the major desktop environments will make you feel right at home if you’ve used Windows (and some are Mac-friendly too!).
Even if you don’t want to make it your daily driver, I still say it’s worth messing around with, whether it’s to breathe life into an old computer that can’t run Windows 11, set up a server to do things like filtering ad domains, or just to understand technology better.
Raspberry Pis have a totally different process to install it, so I will split this article into two sections, one for your standard x86 computers and another for Raspberry Pis.
Foreword
Linux Distro Choice
Choosing a Linux distro to recommend to a first-time user is probably a controversial topic. At the very least, everyone definitely has different opinions on which one is the best for that. For Raspberry Pis, this guide goes over installing Raspberry Pi OS because it’s Raspberry Pi’s official OS for the device and runs well enough on them. Xubuntu will be my distro of choice for x86 computers to keep consistency in this guide and others referencing this. This is because Raspberry Pi OS and Xubuntu have the same desktop environment (XFCE) and are both Debian-based, meaning instructions for both will be roughly the same in most cases. XFCE also runs well on lower-spec hardware while not looking totally ugly.
However, imo, these are also very good first-time user distros I’ve used and think are worth checking out:
- Linux Mint
- Vanilla Ubuntu
- Other Ubuntu flavors like Kubuntu, Ubuntu MATE, or Ubuntu Budgie
- Pop!_OS
- Zorin OS
- Fedora
- Manjaro
DistroWatch is another good resource to find out what Linux distros are out there (along with other non-Linux open source OSs!).
Trying Out Distros
If you’re nervous about installing it on actual hardware, you can also test them in a virtual machine first! Running a VM is basically like running a computer within your computer, and VirtualBox is pretty easy to use. Doing this is also good to just test out different distros if you’re indecisive like me and want to figure out which one you like the best lol.
Pretty much any distro out there can also dual boot with Windows, so you don’t have to commit to getting rid of Windows. Most distro installers also guide you through setting up dual boot.
Secure Boot
This guide should work for Secure Boot computers because Xubuntu is signed for it, but some things can take a bit more effort to get working (notably, Nvidia’s proprietary graphics drivers). All distros I mentioned earlier besides Pop!_OS and Manjaro should support Secure Boot out of the box, also with that caveat.
If you end up running into issues with Secure Boot and you’re intent on not running Windows on your machine, your life will be much easier if you just disable it in the BIOS, if it lets you. From my perspective as a Linux shill (not biased at all :3), Secure Boot is just MS vendor lock-in since MS is the one that manages the keys, and it’s only “needed” because MS, and more recently other companies like those that make game anti-cheats, force it on Windows users.
Anyway I’ve rambled long enough, let’s get to what you actually came here for!
x86 Computers
I did gloss over what an x86 computer is. x86 (64-bit) is the most common CPU architecture for desktops and laptops currently, but you don’t really need to know that. The quick and dirty check if your CPU is x86 is that if your computer was made in the last 15 years and the CPU is an Intel or AMD one, then the CPU is x86.
The reason I specify x86 computers here is that it’s extremely straightforward for most of them nowadays. You can install it on computers with ARM CPUs like late 2020-onward Macs (see Asahi Linux) or Windows PCs with Qualcomm Snapdragon CPUs (see Canonical’s concept for Ubuntu 24.10 on Snapdragon CPUs), but support for them is not as standardized currently. After all, Raspberry Pis have ARM CPUs too and installing it on them is very different than these other 2 examples. (If you’re curious though, I say go for it!)
Prereqs
Make sure you also have a 4GB thumb drive that you don’t care about the contents of, as you will overwrite it with the contents of the Linux distro installer.
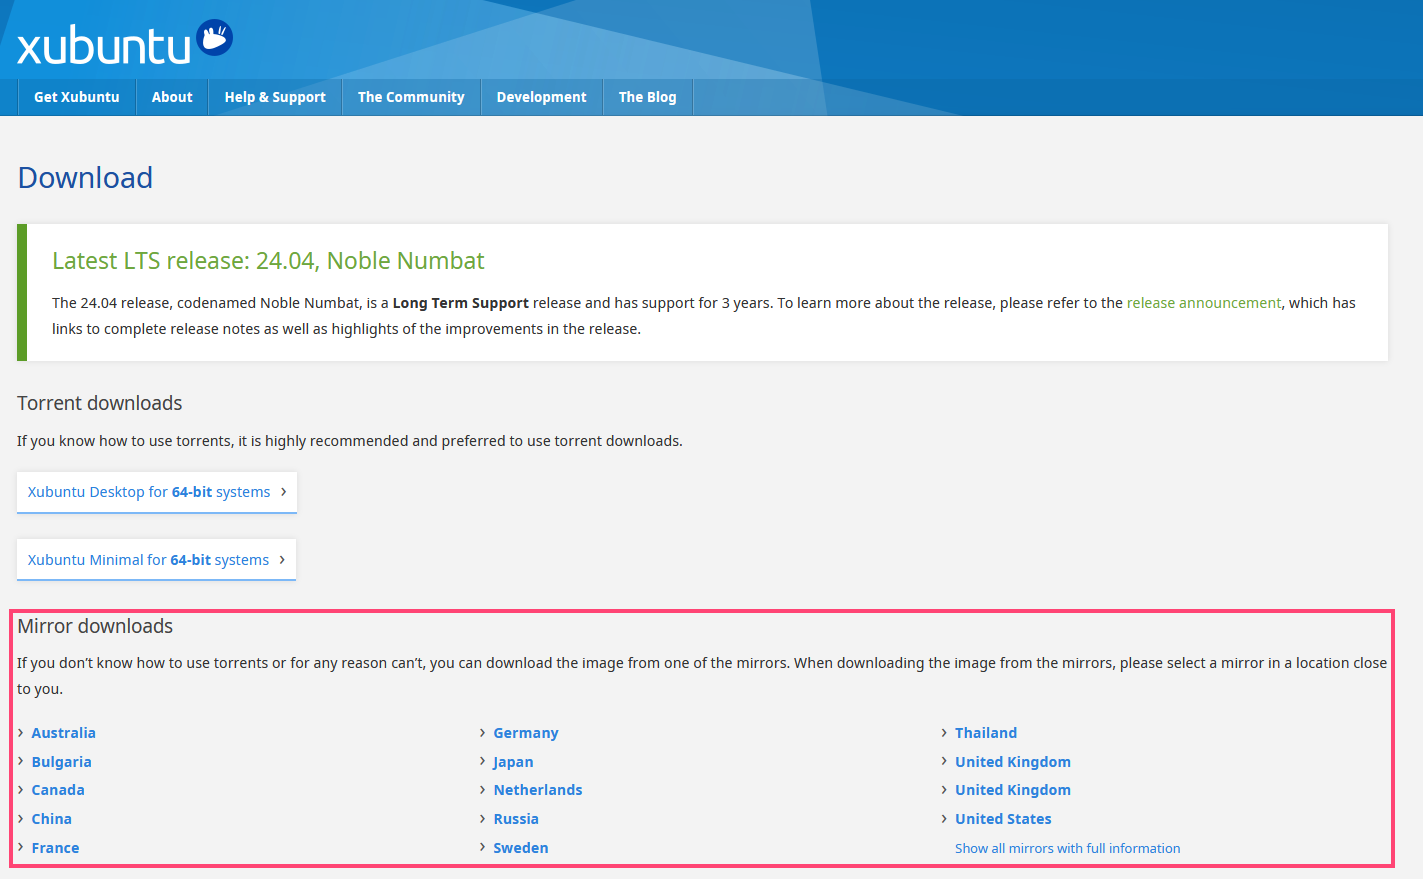
You will also need a Linux distro iso file. For this tutorial, I’m using Xubuntu 24.04, though as I mentioned earlier there are plenty of good distros for first-time users.
To download Xubuntu from here, click a mirror location from that link and download xubuntu-24.04.1-desktop-amd64.iso, unless you have a torrent client.
To write the installer to the USB drive, I like to use Rufus. It’s super reliable and works with pretty much any iso you throw at it, Windows or Linux. Go ahead and install that as well for the next steps.
Set Up the USB Drive
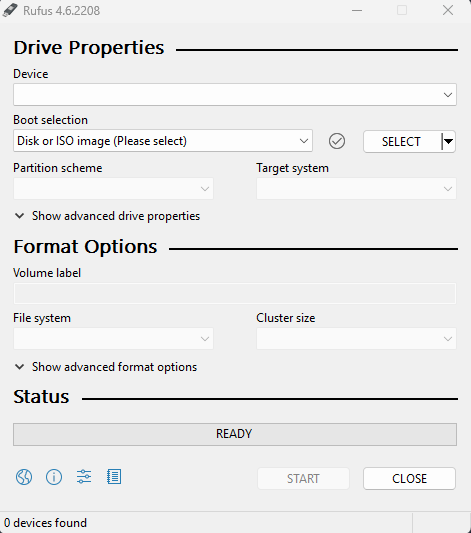
Plug your USB drive into your computer, open Rufus, and do the following:
- Under Device, choose the USB drive you plugged in. (Rufus will hide devices you don’t wanna put the installer on like the OS drive, but always double check that you choose the right device!)
- Boot selection should already be set to Disk or ISO image, but make sure it’s set on that. Then click SELECT to the right of that, picking the iso image you downloaded earlier.
- Leave Partition Scheme and Target System as MBR and BIOS or UEFI, this should be good for any computer you’re planning on booting the installer from. All the other defaults should be good as well.
- Click START. You’ll get asked if you want to write in ISO Image mode or DD Image mode – just leave it at the default and click OK. Also click OK when you’re warned that all data on the device you picked will be wiped (because you double checked you were good on that earlier, right? right??).
- Sit back, relax, and wait for it to finish.
Note
Rufus is not available on macOS or Linux, but Balena Etcher also works with writing isos to USB drives while being very easy to use. This is my recommendation if you’re on one of those OSs.
Once that’s done, plug the USB drive into your computer. Now you will actually install the OS.
Installing the OS
Now we have to boot into the USB drive and then run the OS installer on it. With the USB drive in your computer, turn on your computer and mash whatever key gets you into the boot options on your computer until you get to the list of boot options. If your computer doesn’t say which key does that when booting, it’s usually one of Esc, F2, F10, F11, F12, or Delete, but you may be able to look it up for your computer too.
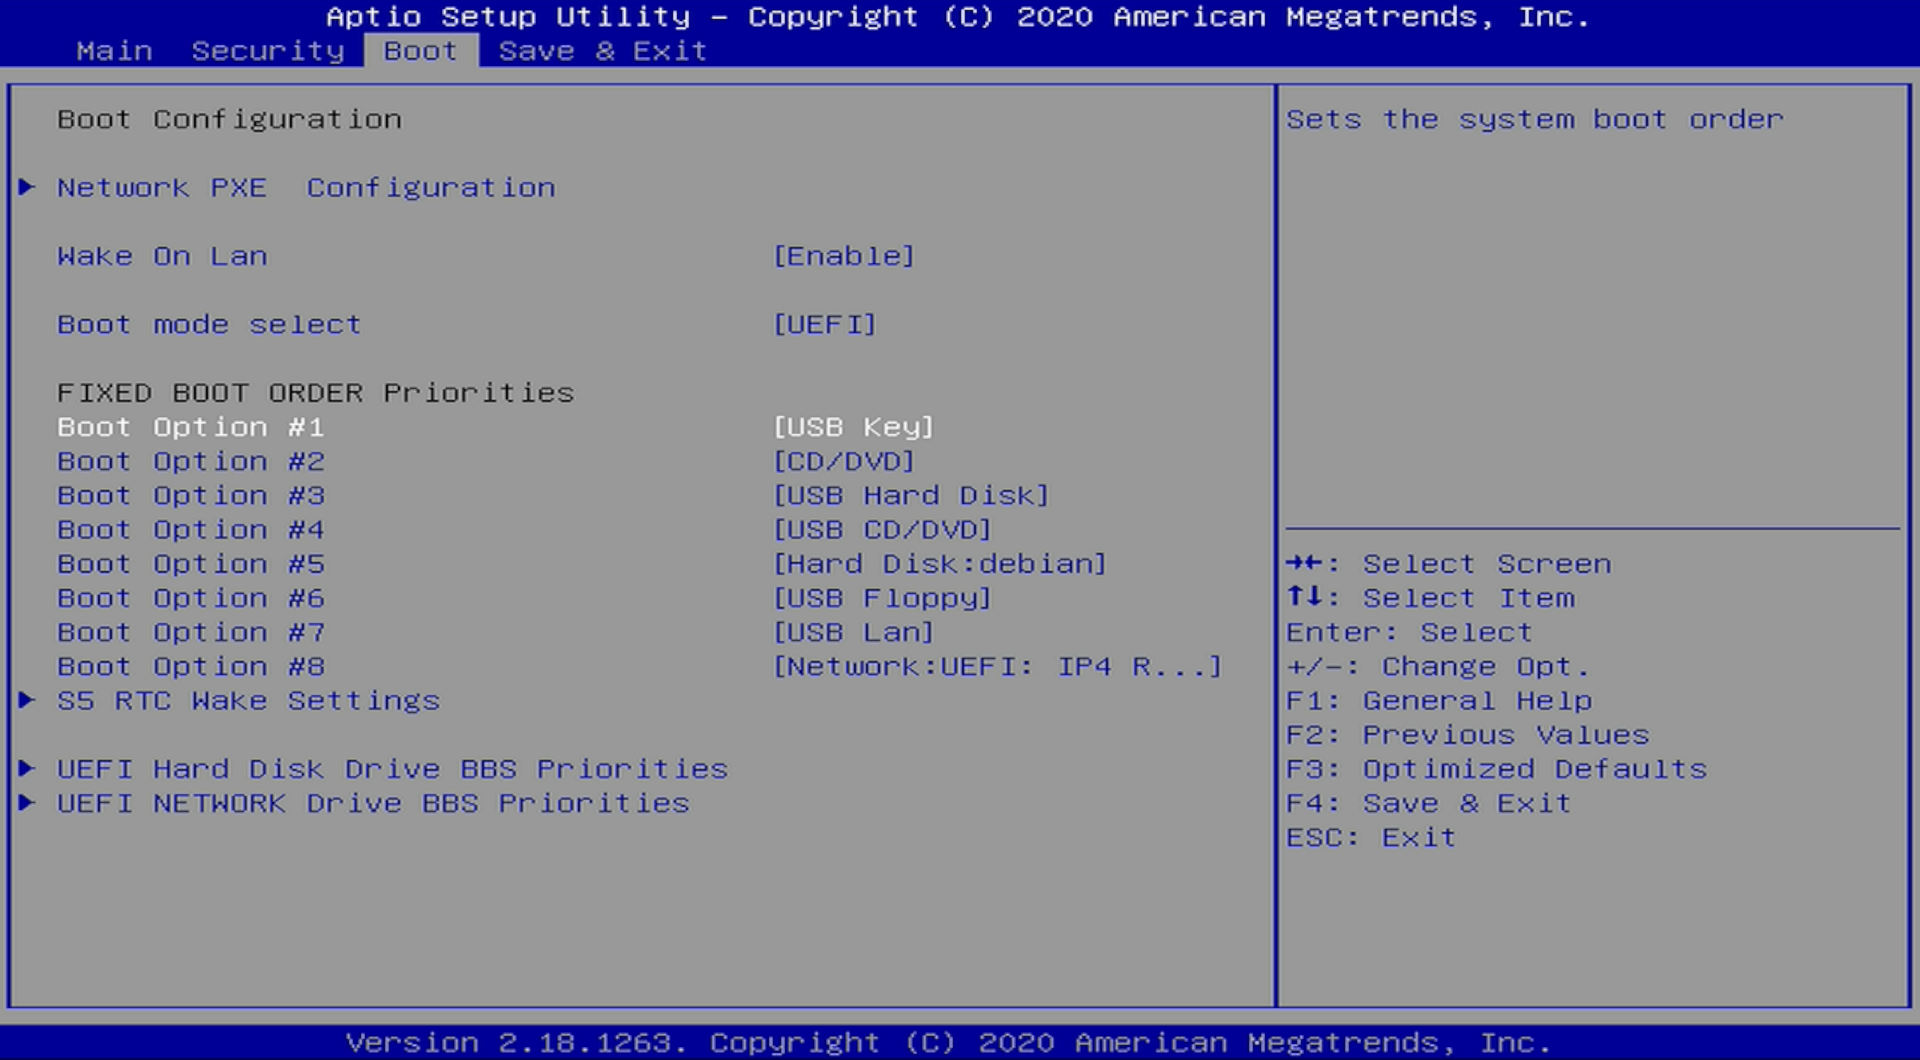
Once you’re in there, choose the thumb drive you plugged in and it will start booting!
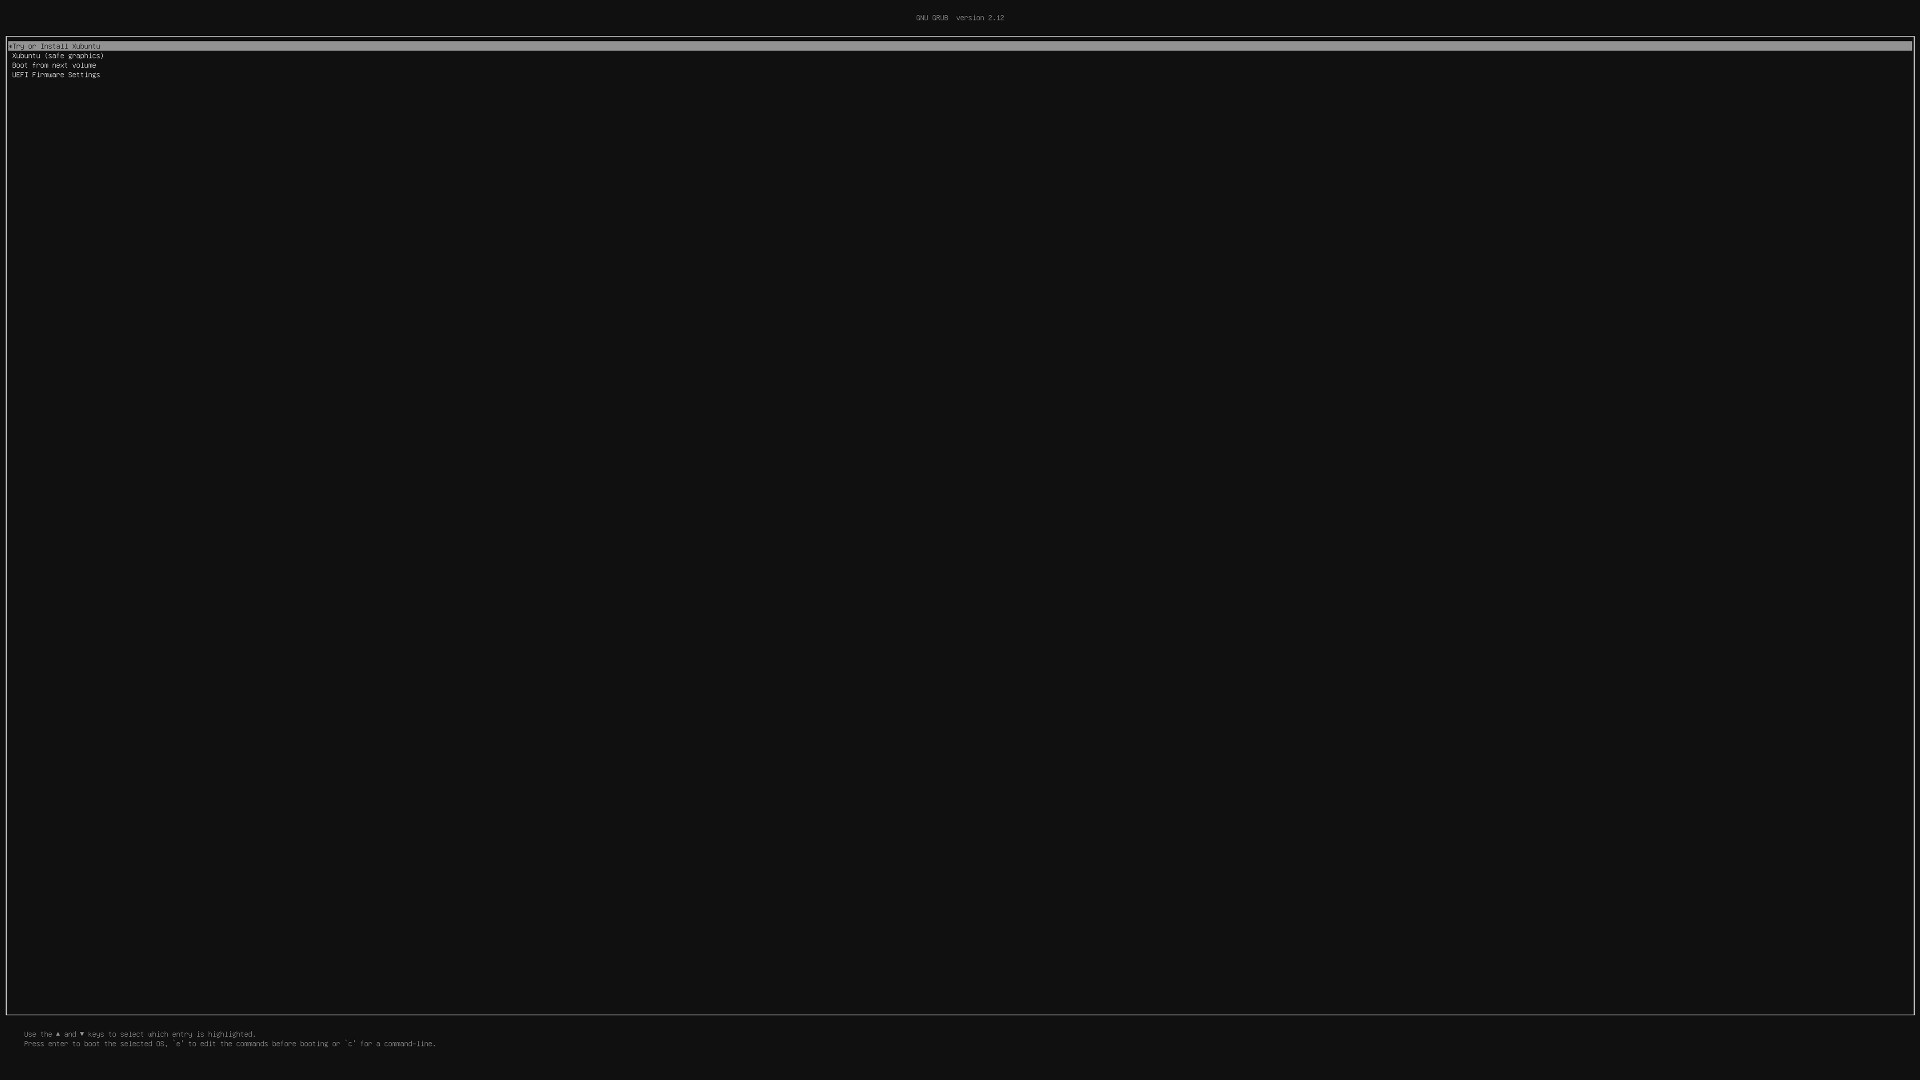
You will reach a desktop after it boots. Just double click Install Xubuntu 24.04.1 LTS and you’ll get to the installer!
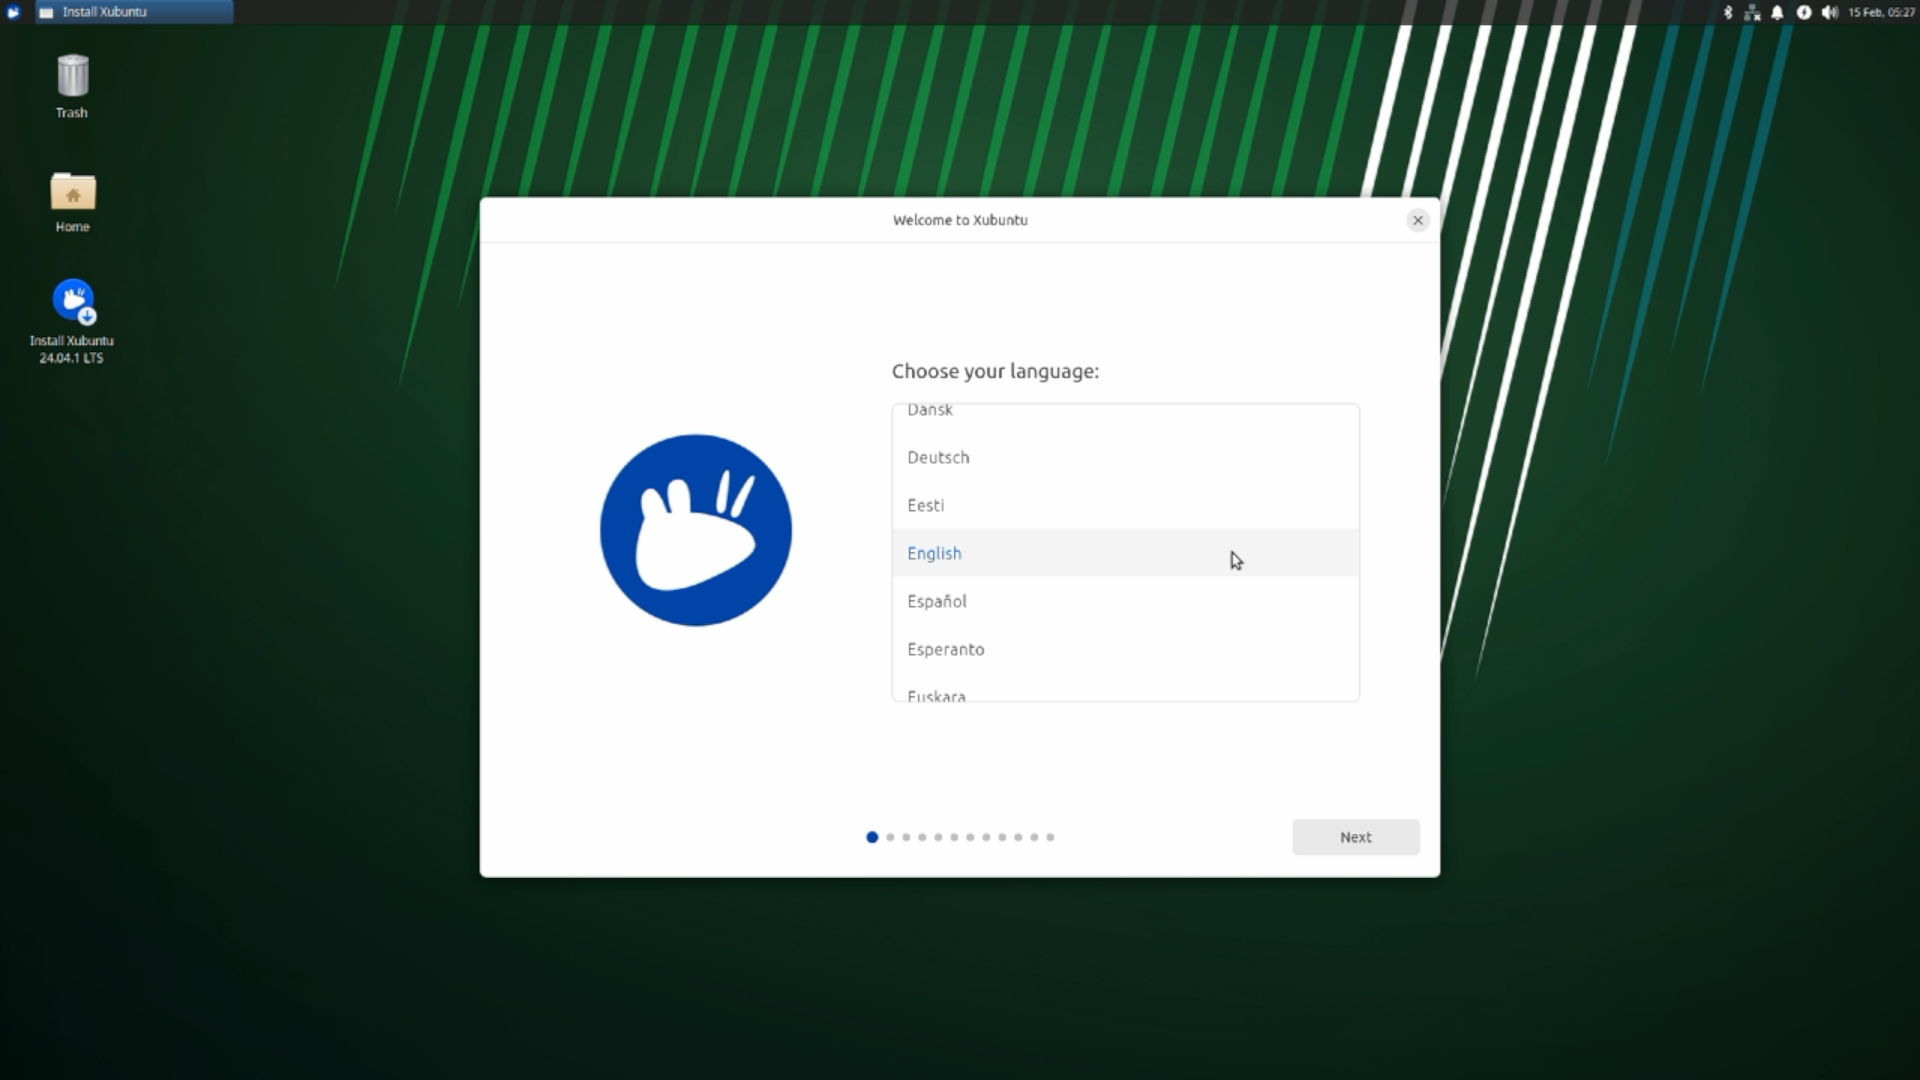
It should be fairly straightforward from here, but here are the steps anyway:
- Choose your language and click Next.
- Choose your keyboard layout and click Next.
- Connect to the internet if you want and click Next. (This will update your packages for security fixes and such right away, though it’s ok if you don’t do it at this point.)
- Choose Interactive Installation and click Next.
- Choose Xubuntu Desktop (unless you’re comfortable installing stuff from the command line, because this won’t even install a web browser for you!) and click Next.
- Choose to install the recommended proprietary software if you want (it’s probably a good idea if you’ll be using this as a regular computer). Click Next.
- This next step depends on if you want to keep the existing OS or not, as the installer asks if you want to install Xubuntu alongside the OS already on it or if you want to erase the disk entirely:
- If you don’t care about anything on the computer or there is no OS on the computer currently, choose to erase the disk and install Xubuntu, and click Next.
- Otherwise, choose to install alongside and move the slider to dedicate some space to Xubuntu.
- Now you can enter the hostname (name of the computer on the network), username, and password. Do all that and click Next.
- Choose your region for timezone purposes and click Next.
- Click Install and now the installer will run! Sit back and wait for it to complete.
Once it’s finished, the installer will give you the option to restart. Go ahead and do that, and now you’re all set!
Raspberry Pi
Prereqs
If you have a Raspberry Pi, make sure you have all the necessary components for it if you didn’t buy it in a kit:
- USB power supply with the proper cable and sufficient power, minimum currents/wattages are:
- 1A/5W for the Zeroes
- 2.5A/12.5W for the 1, 2, and 3
- 3A/15W for the 4/400
- 5A/25W for the 5/500
- The correct HDMI cable for your model:
- Mini HDMI to HDMI for the Zeroes
- Regular HDMI to HDMI for the 1, 2, and 3
- Micro HDMI to HDMI for the 4 and 5
- microSD card, 8GB or larger (plus some way of accessing the SD card on another computer)
For simplicity, I’m going to install Raspberry Pi OS in this tutorial, the officially supported OS for it. Go here and download and install the Raspberry Pi Imager, which will take care of downloading the RPiOS image and flashing it onto the SD card.
Note
Another option is to download the image directly and then use Balena Etcher to flash the image onto an SD card. However, this seems to be broken in Windows – I kept getting errors where
the writer process stopped unexpectedly, and some searching revealed that many lay the blame on Windows Defender. However, RPi Imager worked for me just fine without turning off Defender settings and it works with any.imgfile, not just Raspberry Pi’s officially supported images, so I think it’s a better overall recommendation on Windows.That said, I have never had issues with Etcher on macOS or Linux, so I would also recommend it on those OSs.
Set Up the SD Card
Plug your microSD card into your computer and open Raspberry Pi Imager. You will be greeted with a very simple interface:
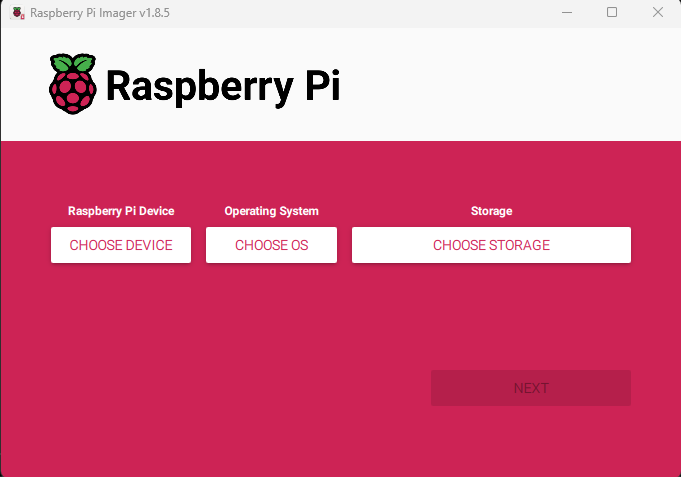
Now do the following:
- Under Raspberry Pi Device, choose your model of RPi.
- Under Operating System, choose Raspberry Pi OS, 64-bit if it’s available. 64-bit will not show up if your RPi doesn’t support it, in which case you can pick 32-bit.
- Under Storage, choose the microSD you plugged in. (RPi Imager will hide devices you don’t wanna install it on like the OS drive, but always double check that you choose the right device!)
- Click Next. You’ll be asked if you want to apply OS customization settings if you want to change the hostname (computer name on the network), username/password, or wifi connection creds, but you can say No and go with the defaults too.
- Sit back, relax, and wait for it to finish.
Once that’s done, just plug the microSD into your Pi and you’re all set!
What Now?
How to Install Programs
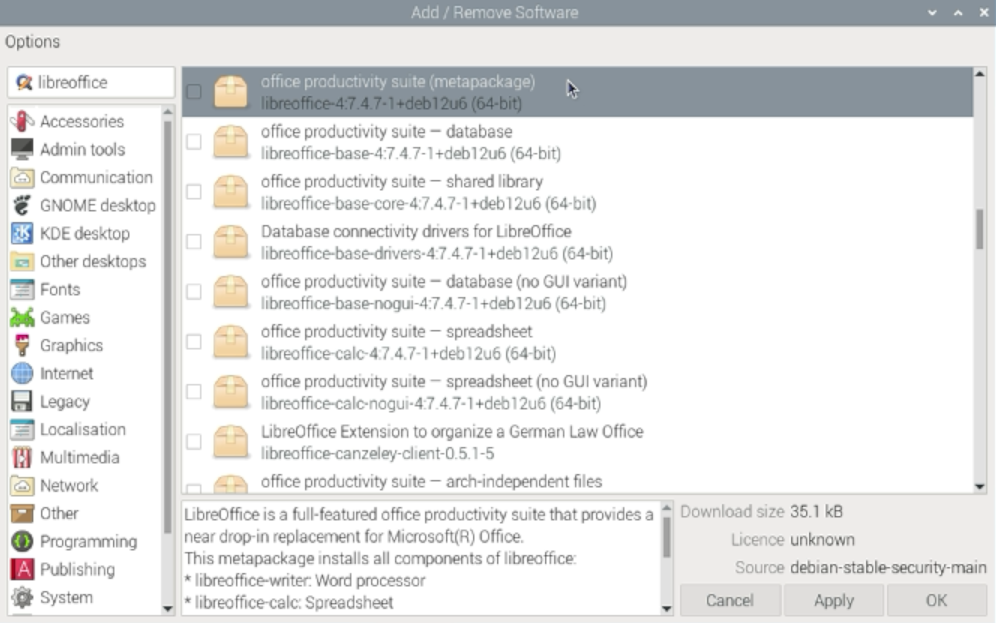
Well, now that you have your Linux distro installed, it’s time to do normal setup things like you would do in Windows or macOS! It’s actually a lot friendlier than Windows to start up with because there’s a program preinstalled to search for software, just like Apple’s App Store:
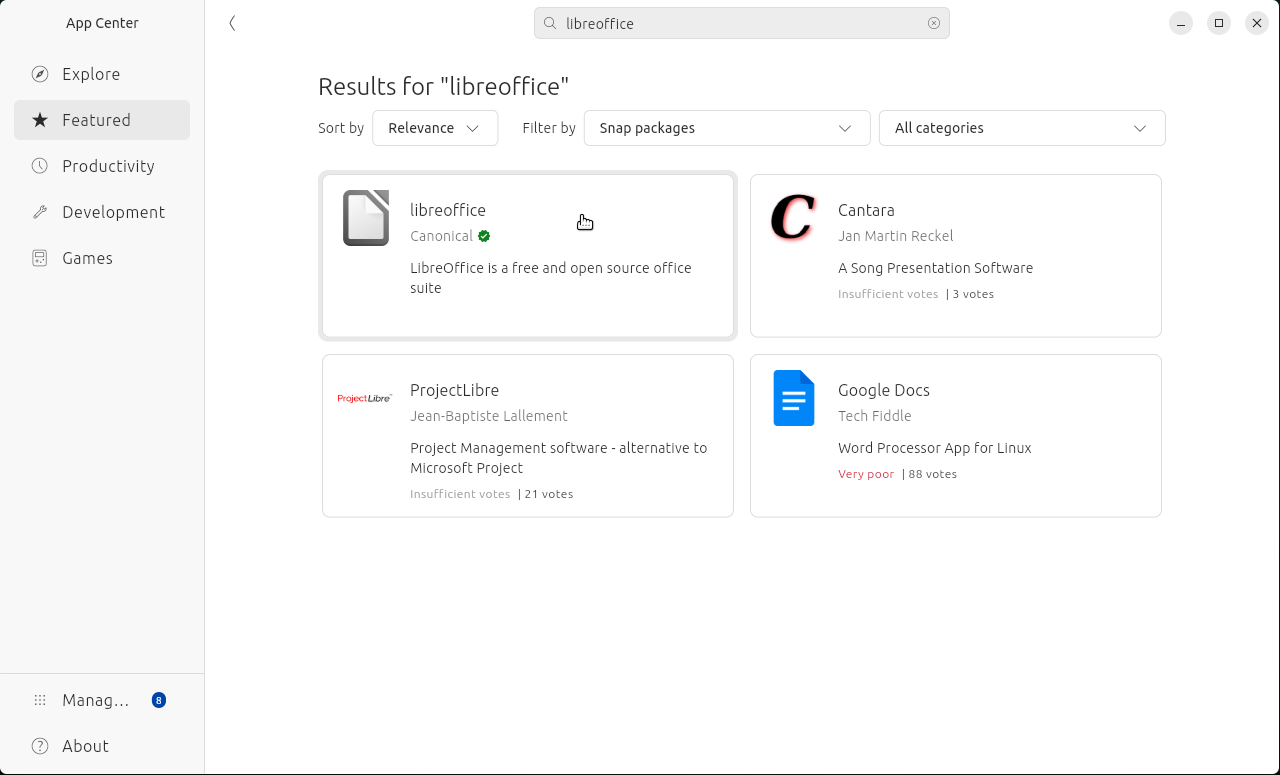
To get to the app installer…
- On Xubuntu, click the menu in the upper-left corner and click App Center.
- On RPiOS, click the menu in the upper-left corner, hover over Preferences, and click Add/Remove Software.
Some programs might not be present in the repositories, in which case you can go to the internet and look for them just like you would on Windows. There are a few formats you will run into on the internet…
.deb: Debian package containing the program, which you can double click in the file explorer and install (or on RPi, right click and click Package Install).AppImage: akin to.exefiles in Windows, a self-contained executable of the program.rpm: RPM package; you will not be able to install this on Xubuntu or RPiOS since they use Debian packages
AppImages take a few steps to be able to run (only the first time after you download it):
- Right click the AppImage file and click Properties.
- Click the Permissions tab.
- Check Allow this file to run as a program and close the properties window.
- Now you can double click the AppImage and run it every time afterward!
Architecture does matter here for all these formats, just like in Windows when you have to make sure a program is 32-bit or 64-bit (and more recently ARM64!). For x86 64-bit make sure you pick packages/AppImages that say amd64, for newer RPis where RPiOS 64-bit is installed choose arm64, and for older RPis choose armhf.
What Else?
It’s time to start using it! When you run into things you wanna do and don’t know how to do, a search engine is your best friend! Exploring and looking things up is how I got all the Linux knowledge I have today, so I can confirm it’s a good way to learn it. Worst case scenario, if things get totally borked, just reinstall it in the same way and try again! (And word of advice, never run sudo rm -rf / :3)
Beyond that, here are some good other first steps before you go off and explore:
-
Update to the latest packages using the app center, or if you’re feeling adventurous, open up the terminal and run:
1sudo apt update && sudo apt upgrade -
If you have a Nvidia GPU, you should install the proprietary drivers because the open source drivers aren’t great (this is thanks to Nvidia not open sourcing their drivers >.>). Fire up a terminal and run this command which will guide you through it:
1sudo ubuntu-drivers autoinstallInfo
If you’re using Secure Boot, Nvidia proprietary graphics drivers will not work without enrolling the driver key to the system.
In the case of Ubuntu and derivatives like Mint or Zorin, when you install the Nvidia proprietary drivers, you should be guided through the process of enrolling the key. You may need to do it manually for other distros like Fedora – just look up
{distro name} nvidia driver enroll mokand you’ll find instructions for this. -
Customizability is Linux’s strongest suit, and most desktop environments are super themable. Check the built-in themes and other themes from the internet and customize to your heart’s content!
- If you download themes, extract them to the
.themesfolder in your home directory (you will have to make the folder first and then show hidden files to see this, as folders beginning with.are hidden in Linux) - If you download fonts, extract them to the
.fontsfolder in your home directory and then reboot (you will have to make this folder too)
- If you download themes, extract them to the
And last of all, have fun with it! How often do you get to say you’ve tried a new operating system?
Also if you have questions, feel free to DM me, I’m always glad to help out!