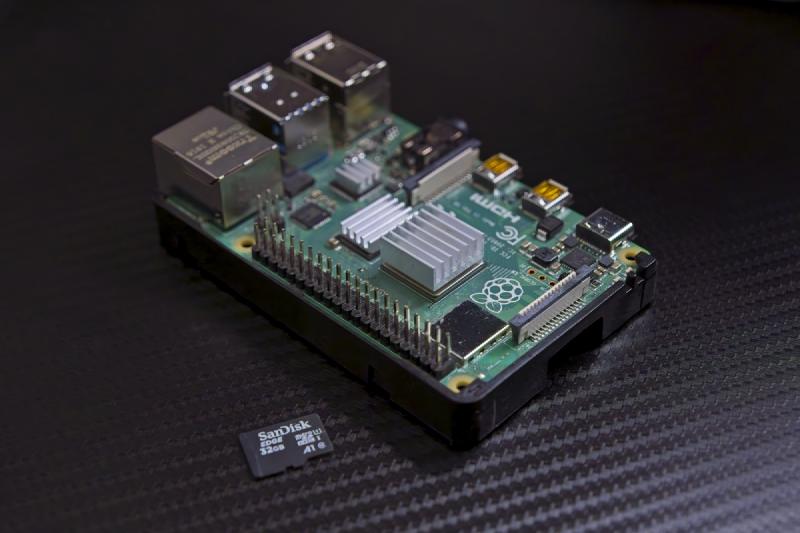
I would be lying if I said I didn’t like Raspberry Pis. They’re such cute little computers and yet they’re actually pretty powerful – even the original Raspberry Pis could run a full on desktop when they first released in 2012, yet they also have very low power consumption and therefore are perfect to have running as a server 24/7. So naturally, they’re really good devices for blocking out ad domains, malicious domains, and other domains you just don’t want to access, and Pi-hole is a perfect open-source server to use with them. (Hint hint, this is another precursor to an article I’m going to be making about blocking Big Tech domains :3)
That said, you don’t need a Raspberry Pi to set up Pi-hole either! If you have an old computer laying around collecting dust, setting that up as a Pi-hole server is a perfect chance to breathe new life into it! As long as it’s not too old (I would expect anything 2012 or newer to be good enough), it’ll still run fine since domain name blocking and DNS querying isn’t resource intensive. I’ll cover both using a RPi and using other computers in this article.
Btw, check out this article explaining how domain names work if you want to know more about how this works. However, you don’t really need to know how they work to know that this will filter out whatever domains you want!
Installing an Operating System
Since Pi-hole only runs on Linux, you will have to install Linux (which means it’s time for me to do what I do best, shilling for it >:3). I promise it’s a lot simpler than you would think… most distros just use regular graphical installers nowadays just like Windows and macOS, and have regular desktops that are similar to those as well.
I wrote this article with instructions both for Raspberry Pis and regular computers which will get you up and running with a Linux distro quickly. Go there and follow the steps in that article before returning here, since you need to have a running Linux distro to proceed!
Setting up Pi-hole
Pi-hole has a getting started guide here, but I’ll walk you through the basic setup. The instructions here work regardless of whether you’re using a RPi or another computer.
One thing I highly recommend is that you plug the Pi-hole device into Ethernet, rather than using wifi. You can use wifi if you really want to, but Ethernet is much more stable and reliable which you really want for running a server that your other devices will connect to.
Installing Pi-hole
-
Connect the device to the internet via Ethernet if you haven’t done so yet, since we will need to set up a static IP address (which is assigned to a specific network interface).
-
It’s time to set a static IP address. This is because if you don’t set one, your router will occasionally reassign local IP addresses of the devices connected to it, which means you’d have to keep reconfiguring the DNS server of your devices connecting to the Pi-hole server.
-
Open a new terminal (using the start menu equivalent in XFCE or pressing Ctrl+Alt+T) on the Pi-hole device and run the command:
1nmcli device showIn the output, look for
IP4.ADDRESS[1]andIP4.GATEWAYand take note of their values. They’ll be formatted similarly to below:1 2IP4.ADDRESS[1]: 192.168.1.45/24 IP4.GATEWAY: 192.168.1.1Your computer’s local IP address is before the slash in
IP4.ADDRESS[1]– this is what we will be changing. The key here is to set an IP address that isn’t being used by your router. Ideally you should go into your router settings and find an IP address that isn’t being used by another device on the local network. If your netmask is/24(it most likely is), the easiest thing to do here is keep the first 3 sections separated by dots intact and change the last section to the highest unreserved number in that section,254, since this is very unlikely to conflict with other devices. So in this example, the static IP address I want to assign is192.168.1.254.Keep note of these for later too: After the slash in
IP4.ADDRESS[1]is the netmask.IP4.GATEWAYis the gateway which we will be copying over too (this is most likely the IP address of your router).Note
Btw there is a LOT I am glossing over here. This article by DigitalOcean goes much more in depth if you are curious what this all means.
-
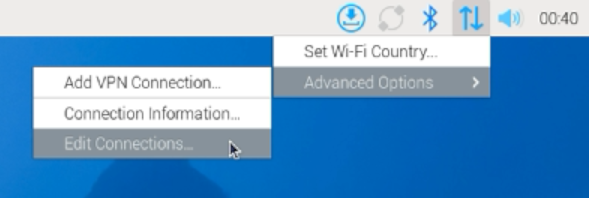
Go to the connection settings. This will be the same in RPi OS and Xubuntu, by going to the network systray icon and going to Edit connections…
-
Click the connection you’re using (Wired connection 1 if using Ethernet) and click the gear icon. This opens up an edit connection window. Click the IPv4 Settings tab, change the Method to Manual, then add the stuff you noted in step 2.1. In my example, I would put the following in there:
Address Netmask Gateway 192.168.1.254 24 192.168.1.1 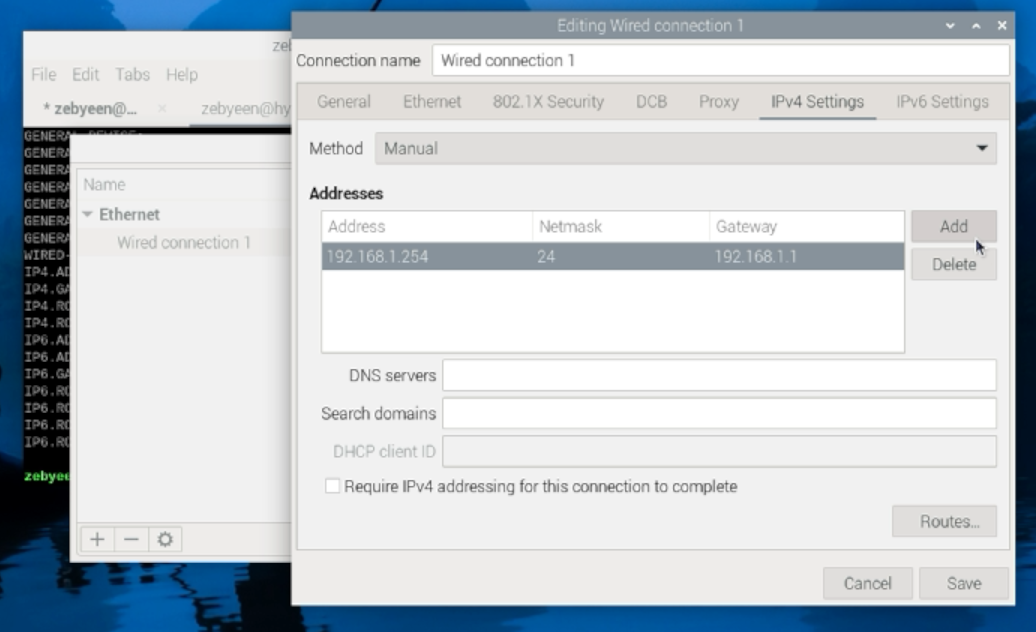
-
Click Save and close the Edit connections menu, and restart the device. This will ensure we reset the IP address. If you wanna confirm this worked, run that
nmcli device showcommand again and you should see the new IP address! Then runping example.com(or any website, really) to make sure you’re actually connected to the internet – you should get lines saying you’re receiving bytes which means you’re actually connected.If you get something else like “Temporary failure in name resolution” or nothing at all, your router hasn’t given your device the new address and you might just need to try restarting the device again. (I ran into this issue myself… >.>)
-
-
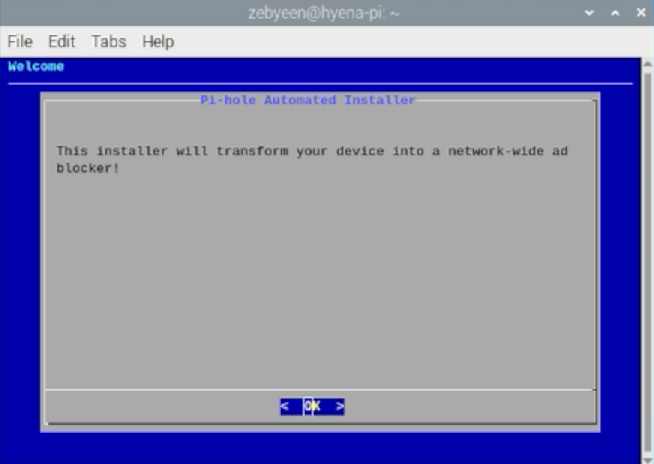
Phew, the hardest part is over now. Open a terminal and copy, paste, and run this command, which downloads the Pi-hole install script and runs it:
1curl -sSL https://install.pi-hole.net | bash(Btw it’s not Ctrl+V to paste in the terminal, you have to press Ctrl+Shift+V)
You will eventually get to the screen below. Press Enter until you get to where it says you need a static IP address. Since we just did this, you can press the arrow keys to highlight Continue and press Enter.
It will now guide you through some things to configure…
- DNS Provider: I use Quad9 (filtered, DNSSEC) currently for its security in blocking malicious domains, but any choice here is good. Google and Cloudflare are probably the fastest and most reliable
- Blocklists: it will recommend a domain blocklist to get started with blocking ads, I recommend saying yes since it’s a well-maintained list
- Admin Web Interface: Say yes to setting up the web interface, as it makes configuring Pi-hole way easier after this initial setup
- Also say yes to installing
lighttpdand required PHP modules
- Also say yes to installing
- Query Logging: doesn’t really matter, I just set it to no personally
- FTL privacy mode: this is for stats that Pi-hole keeps track of and shows on the web interface, again doesn’t really matter (note that in this menu you have to press Space to make your selection before pressing Enter to confirm!)
-
Now sit back while the script finishes up, and you will soon reach the screen below. Now Pi-hole is set up! Keep track of that password since you’ll need it in just a sec.
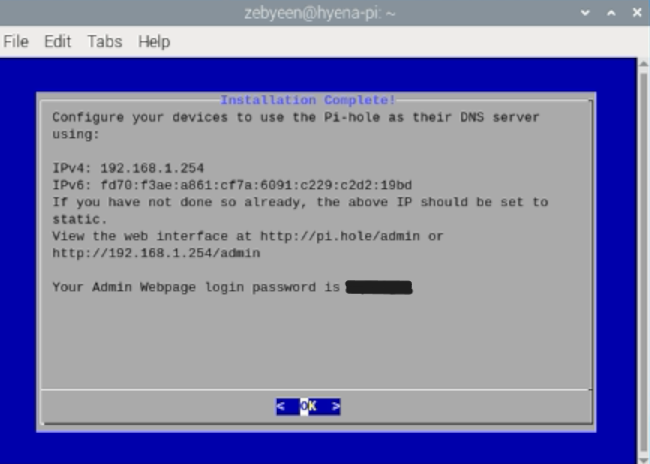
Or if you want to change the password, press Enter to exit the installation and run this command, which will prompt you to type in a new admin password:
1pihole -a -p
A quick note, that pi.hole/admin domain will not work until you’ve set up the Pi-hole device as your DNS server, and it won’t work on the Pi-hole device itself.
Also whenever you want to update it, you can just run this command on the Pi-hole device:
|
|
Configuring Pi-hole
For now, open a web browser (either on the Pi-hole device or a separate computer), go to http://{the static IP addr}/admin, and log in with the admin password. You’ll be greeted with a dashboard like this:
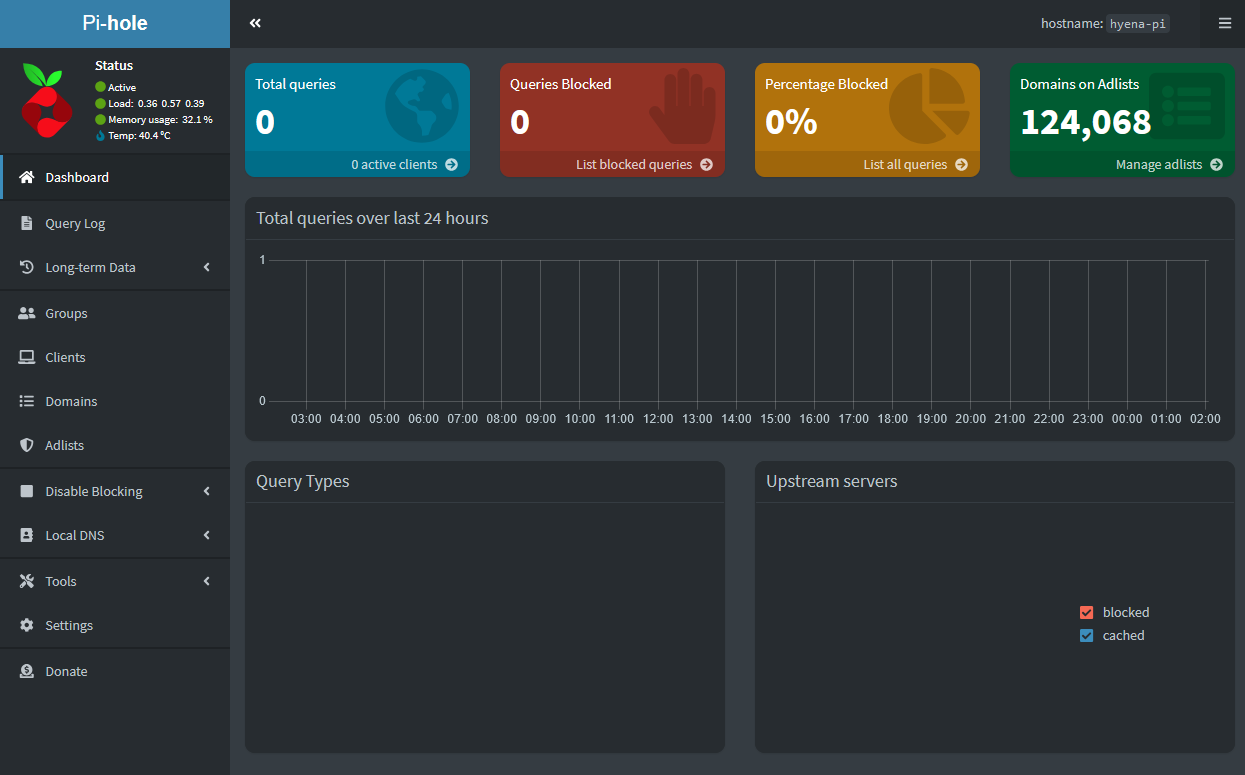
If you want to block any domains, you can just go to Domains in the sidebar and add domains, including with wildcards! For example, if you wanted to block all Google domains and subdomains, you can just add google.com and check Add domain as wildcard, which will block subdomains too. (Or if you know regular expressions you can get even more specific with domains you block!)
If you want to block using a predefined block list, that will be through the Adlists sidebar option. You can add URLs to lists that are hosts file redirects, lists of URLs to block, or even lists in AdBlock Plus format.
For example, this is a link to the EasyList adblock list with full domains extracted. If I wanted to add this list, I would just paste the URL https://v.firebog.net/hosts/Easylist.txt into the address field, click Add, then do that gravity list update linked on the Adlists page to update the full blocklist.
This is all you’ll likely need to do on the Pi-hole side, but there is more you can do here too. If you’re curious, I recommend exploring around the dashboard and also checking the Pi-hole docs.
Pointing Your Devices to the Pi-hole
Now you just gotta change the DNS server on your devices so they use Pi-hole instead of whatever your ISP assigned. You will need that static IP address from before.
The easiest way to do this is by changing the DNS server on your router, since the DNS server set there propagates to all devices connected to it. However, you can also do this on individual devices.
Updating the Router DNS Servers
Because it does propagate to all devices using the router, make sure that everyone that uses that router is on board with using Pi-hole as their DNS server first before they have any unexpected surprises.
These instructions will depend on your router, but they more or less follow a similar set of instructions. Look on the bottom or back of your router for a sticker that kinda looks like this:
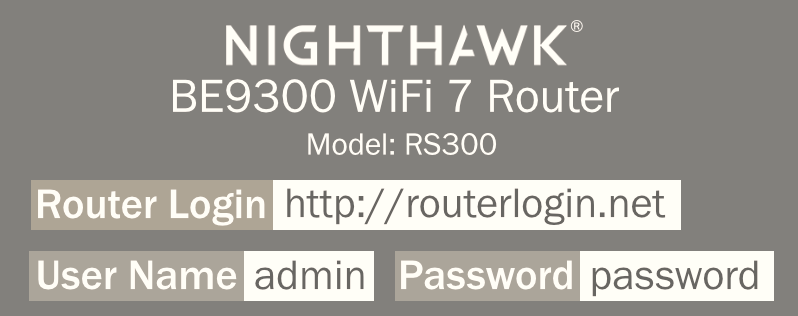
Go to that URL (which may be a domain name like above or an IP address like 192.168.1.1) while connected to your router and it will take you to your router’s login page, where you can put in that username and password.
This part also differs between routers, but generally you’re looking for something along the lines of internet setup or WAN setup. You might be lucky and find it in the basic settings like my router, but you may have to go to the advanced settings to find this. (When in doubt, consult your router’s manual!)
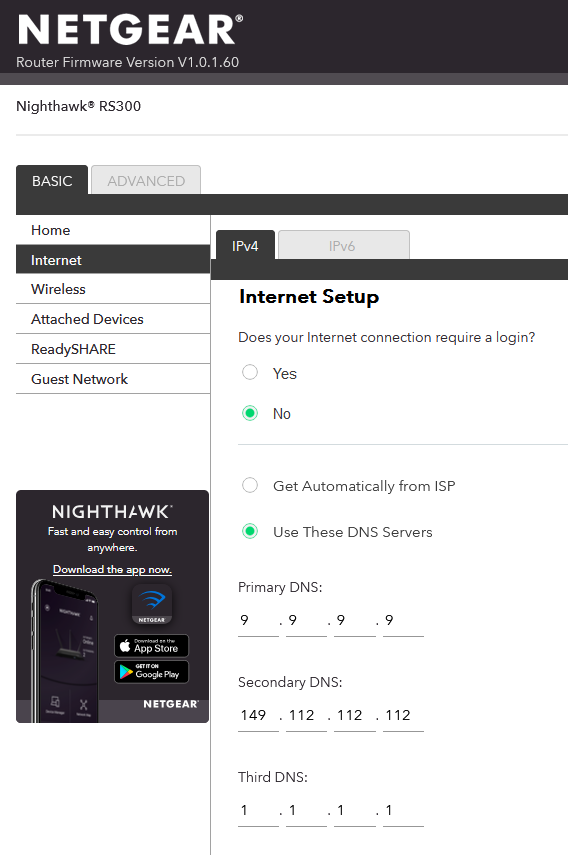
Now just change the DNS server to the static IP address of the Pi-hole device and you’re all set! Don’t set any secondary or tertiary DNS servers or your domain filters on the Pi-hole may not actually work. If your router requires more than 1, just set additional ones to the same IP address.
Updating Device DNS Servers
Unfortunately my roommate uses Meta apps and Shitter still, so changing my router to the Pi-hole device isn’t a viable option, and I’m sure many of you are in the same situation. However, you can still set your device’s DNS servers.
This also varies by operating system. I’ll show how it goes for Windows 11, but this is doable on most devices out there.
On Windows 11:
- Open Settings, go to Network & internet, and click the network connection you’re using (Ethernet or Wi-Fi).
- Click Edit under DNS server assignment.
- Change the drop down from Automatic (DHCP) to Manual. Turn on IPv4 and put your Pi-hole device’s static IP address in the Preferred DNS. Ignore everything else and click Save.
It should look like this once configured:

If you want to confirm you’re connected to the Pi-hole device, just go to http://pi.hole in your browser. If all was done right, you’ll be taken to the Pi-hole login page!
And that’s pretty much it! There’s more you can do here and if you’re interested, definitely take a look at the Pi-hole docs. Have a great day and I hope you enjoy your new domain filter!